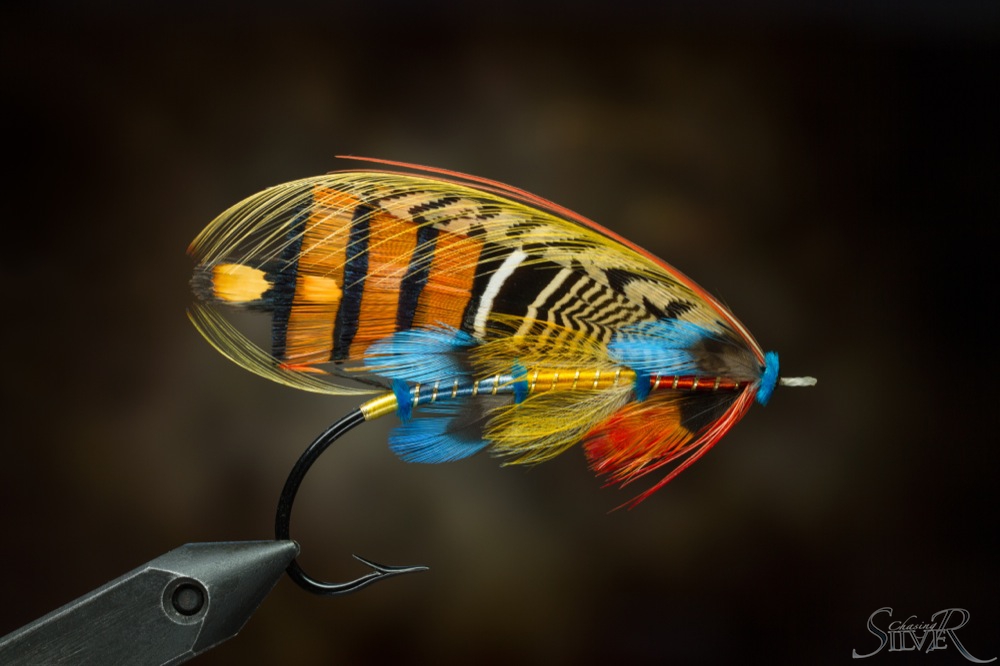
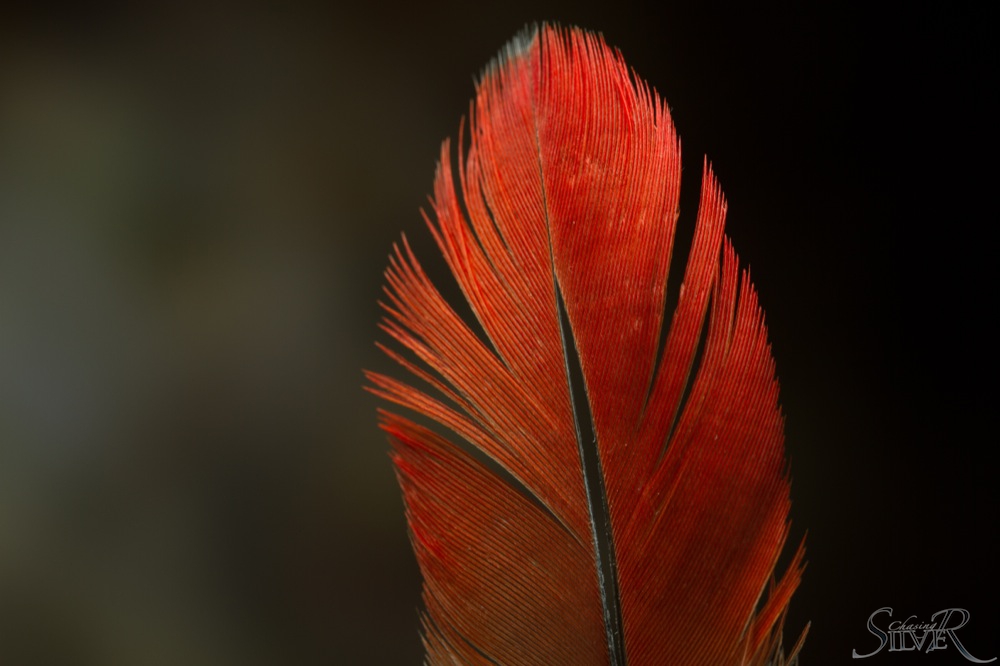
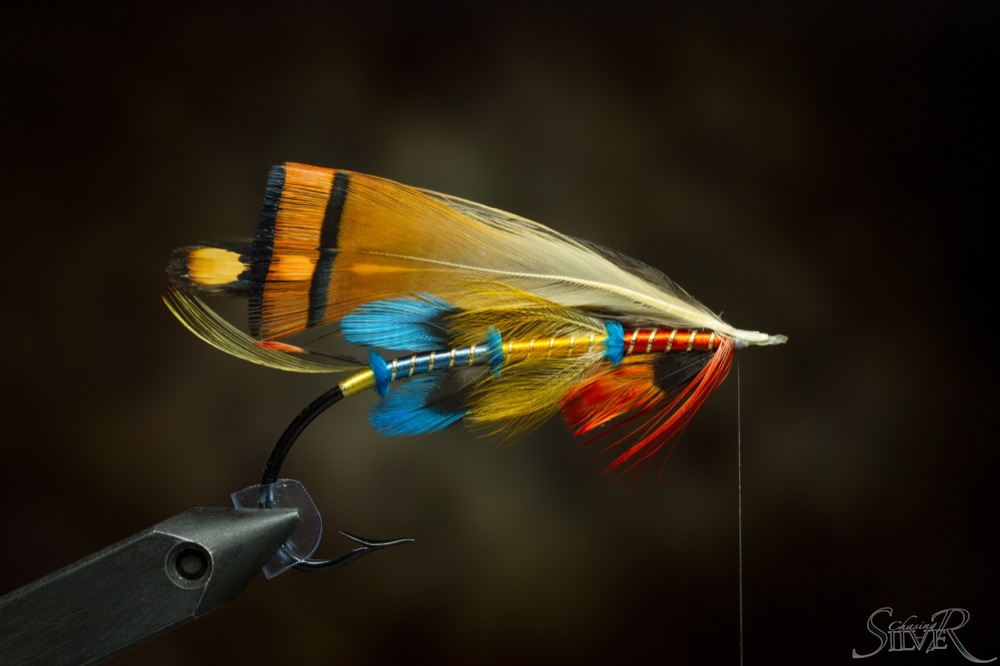
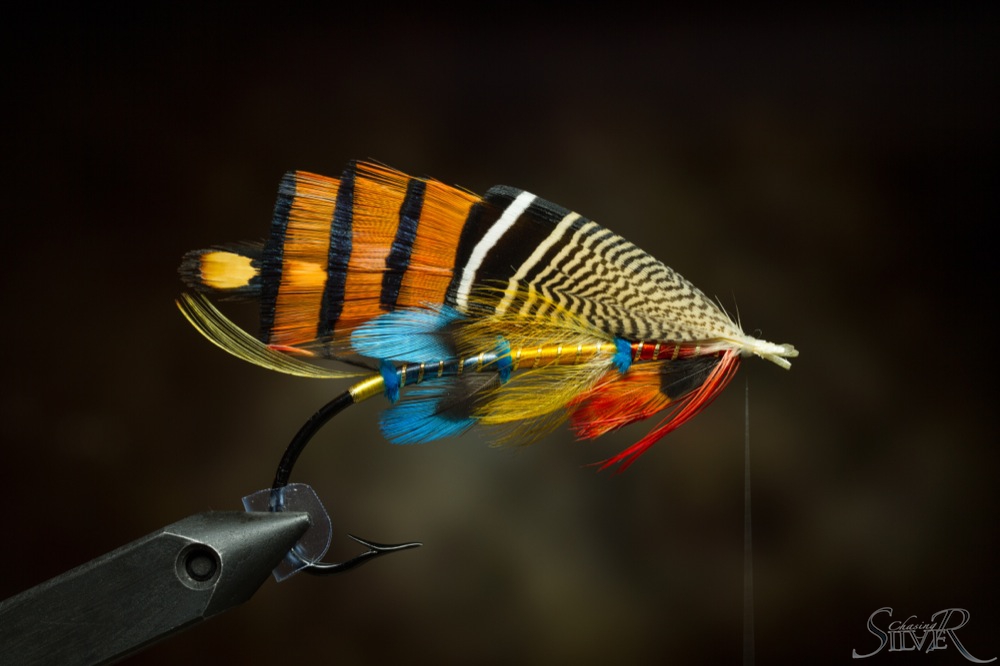
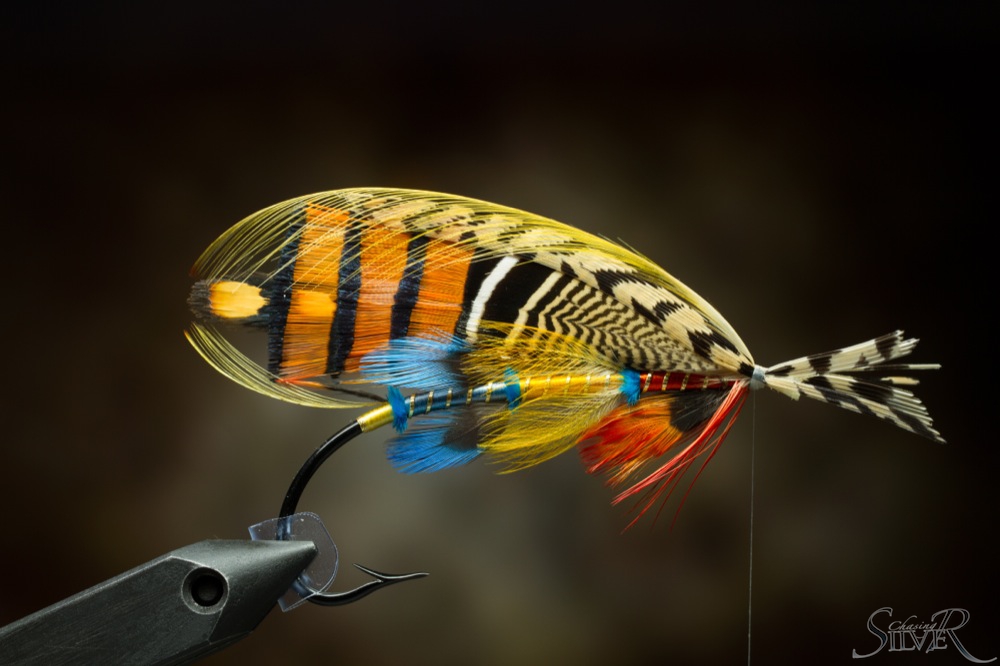
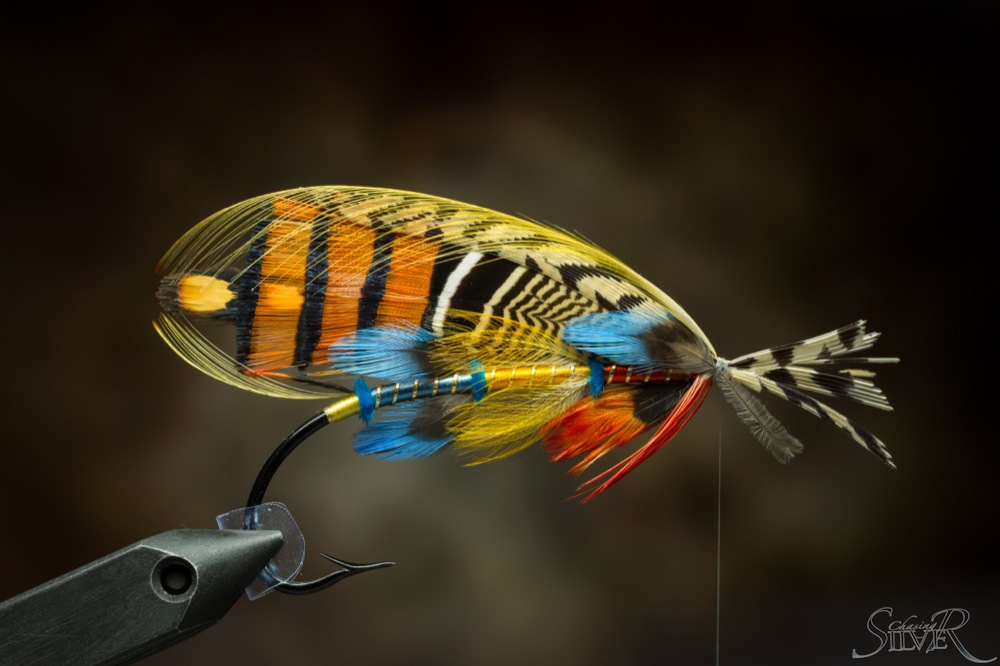
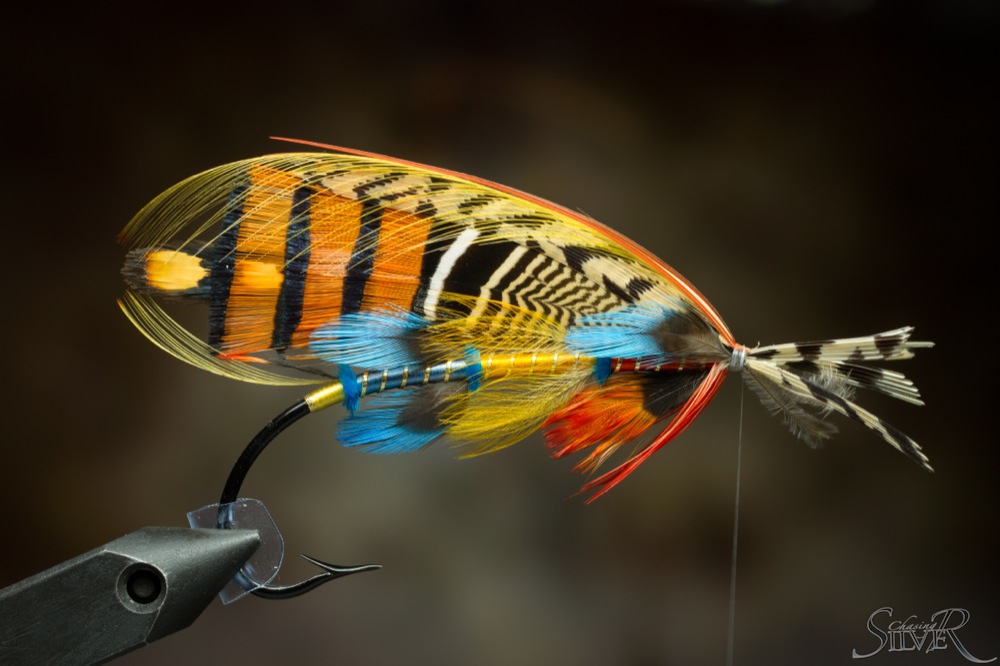
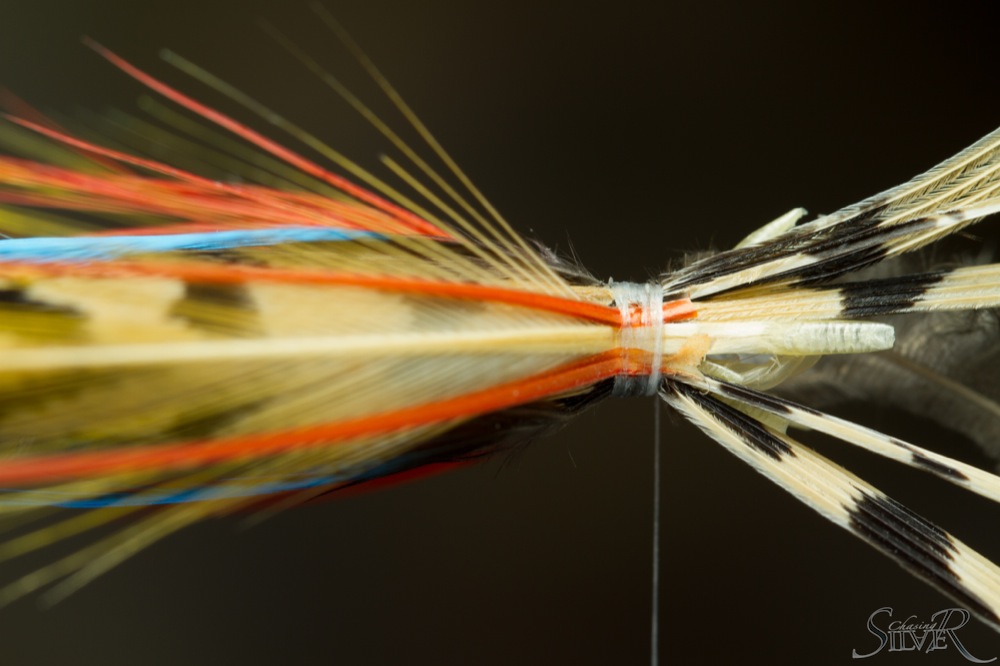
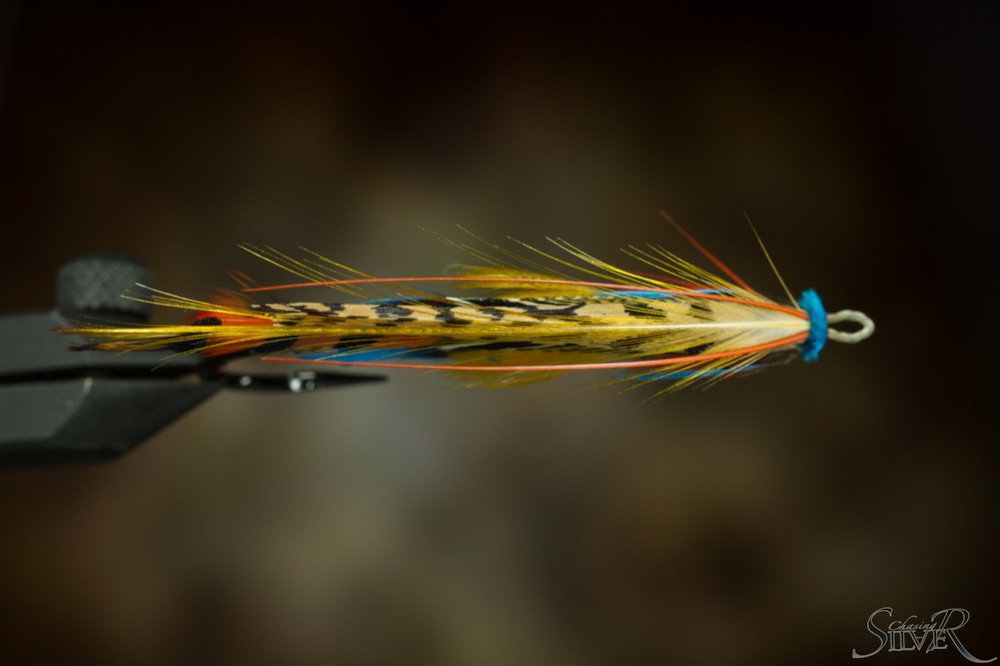
Related to my article “Major Traherne – Top of the Classics” published in issue 3/2014 here’s a thorough step-by step guide with advanced tying tips and tricks. In the following fifty images I tie one of Traherne’s patterns Nepenthian. All feedback and discussion welcome using the comment box at the end of the article.
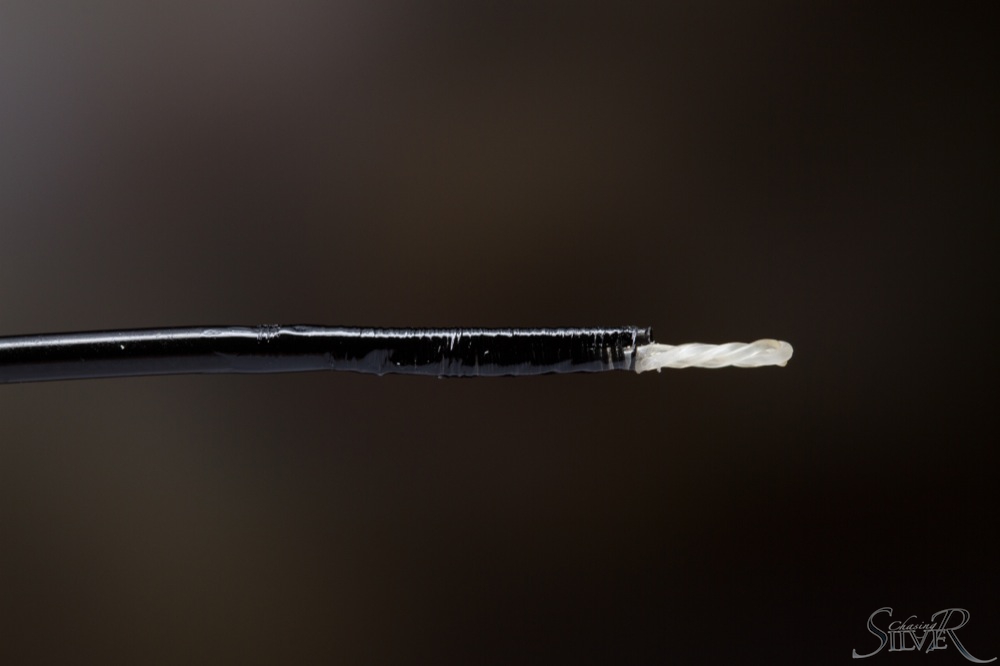
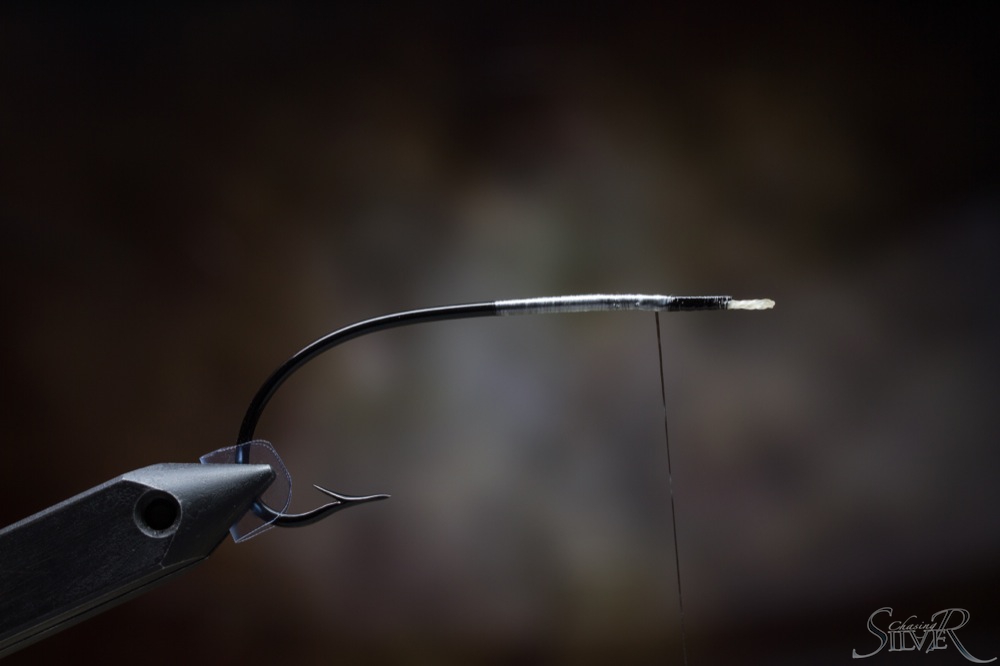
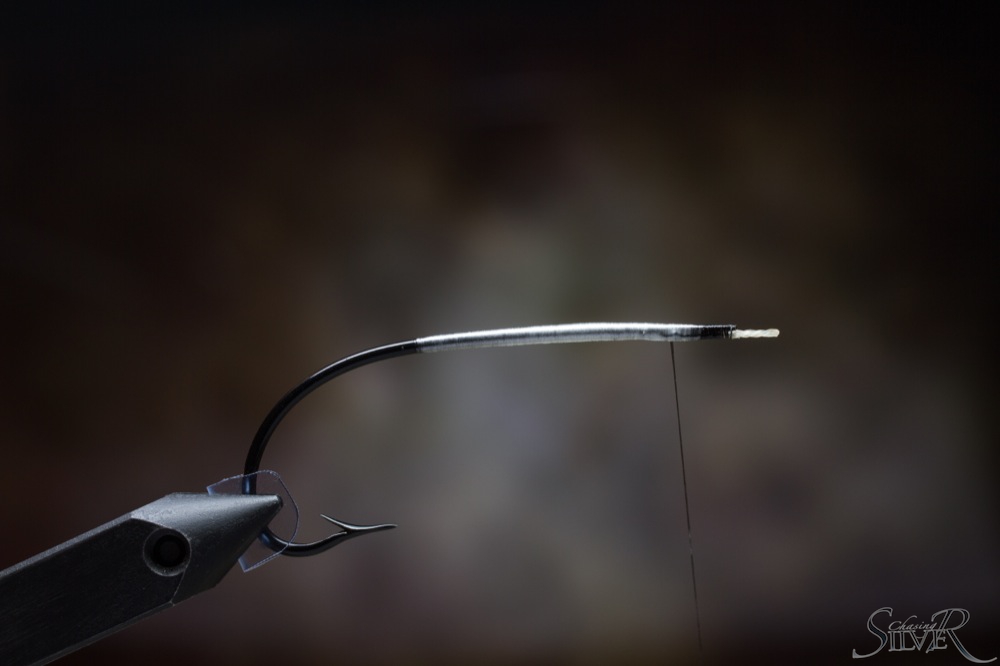
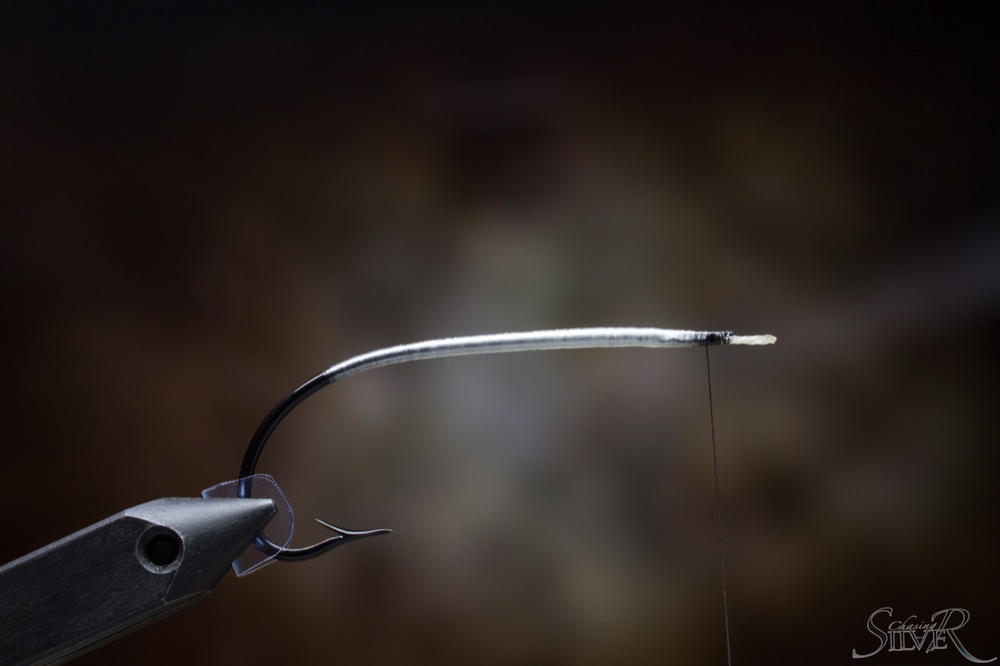
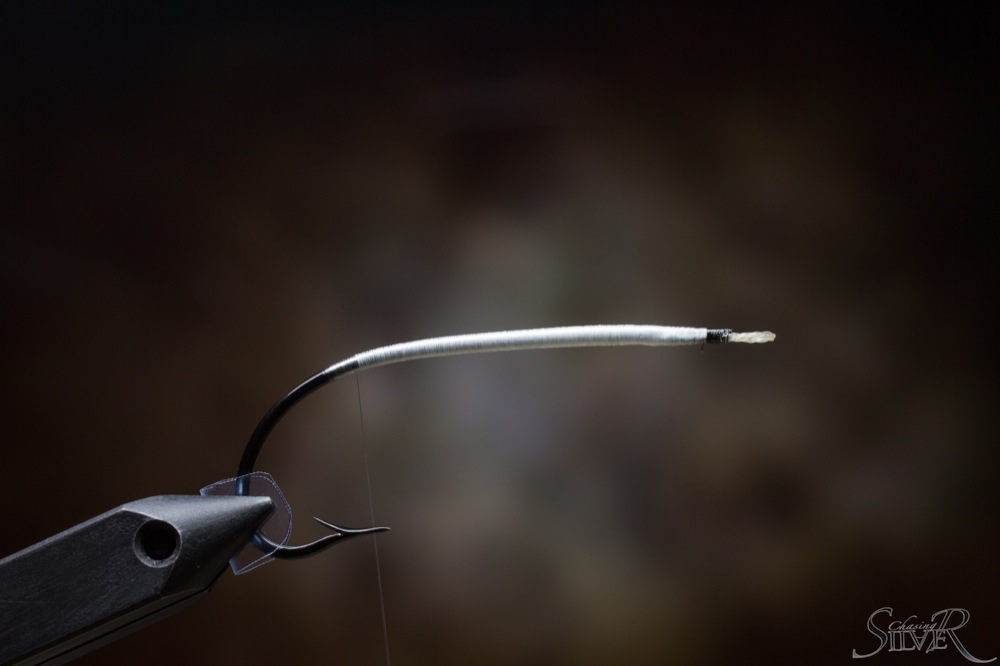
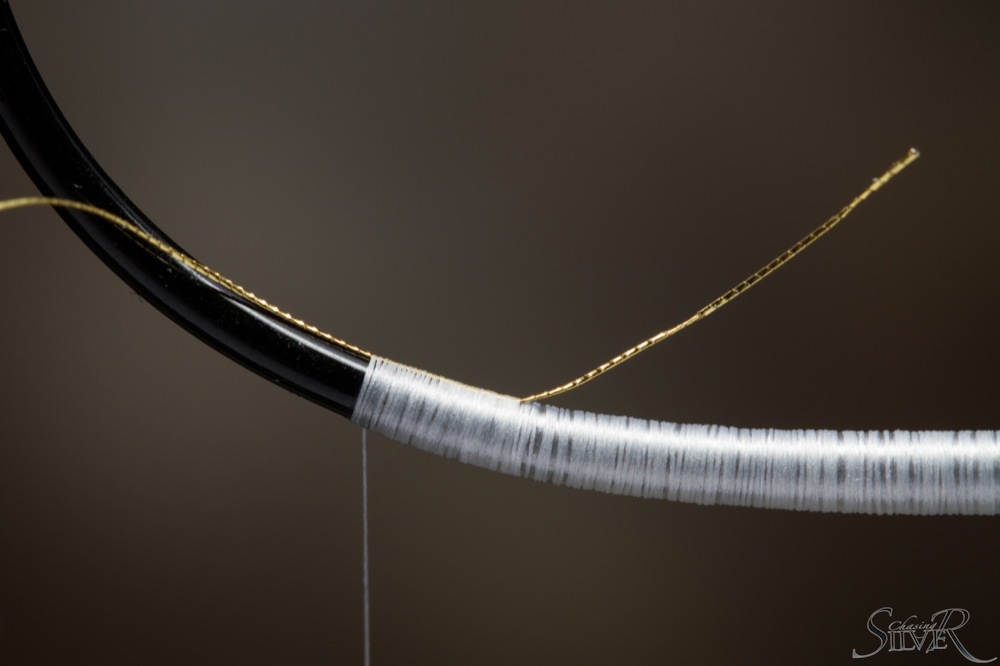
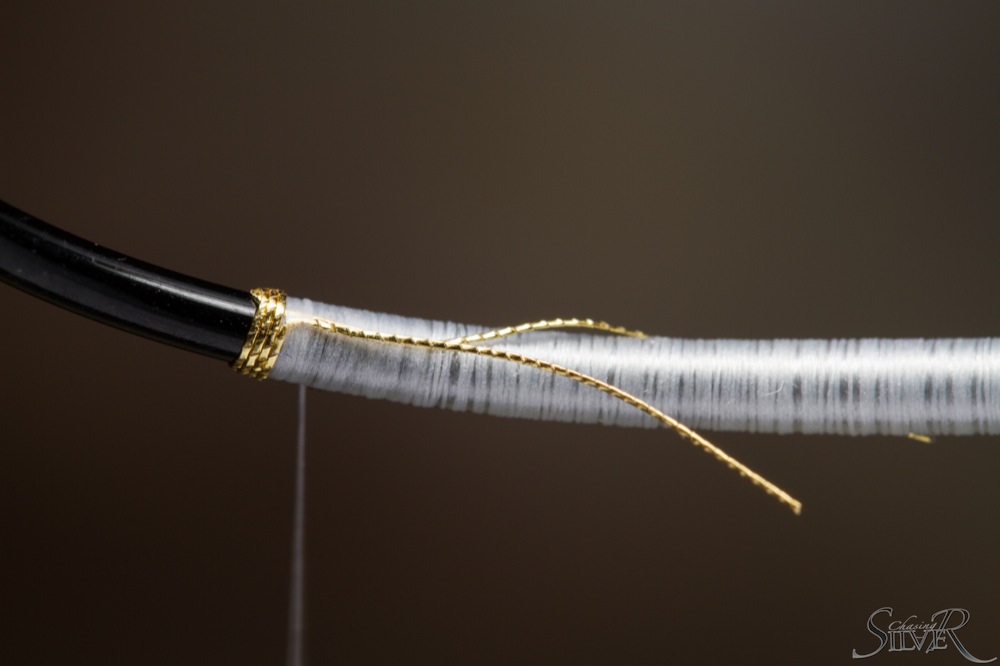
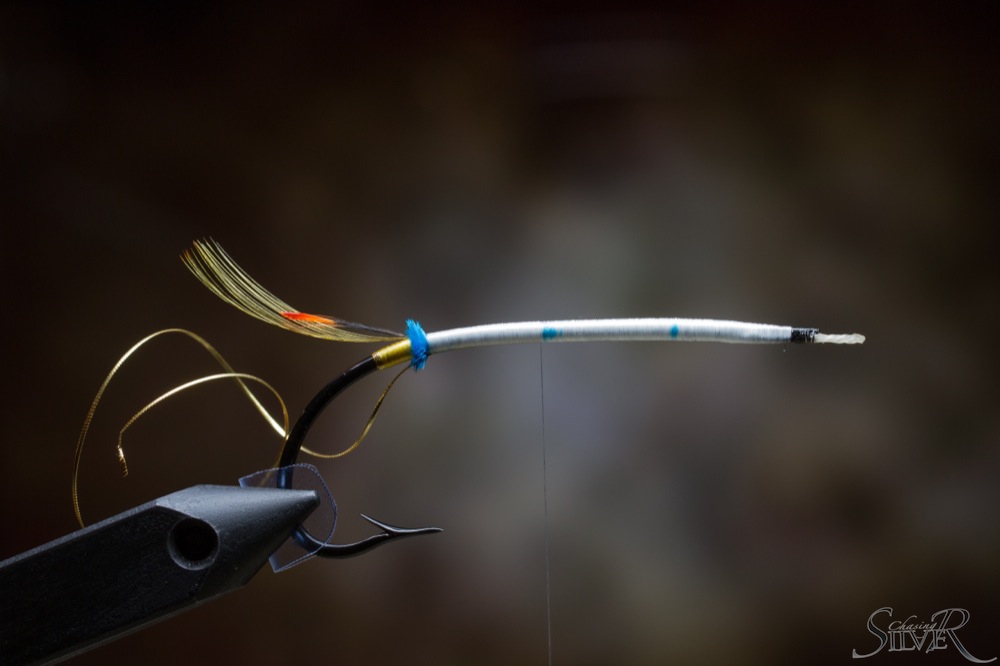
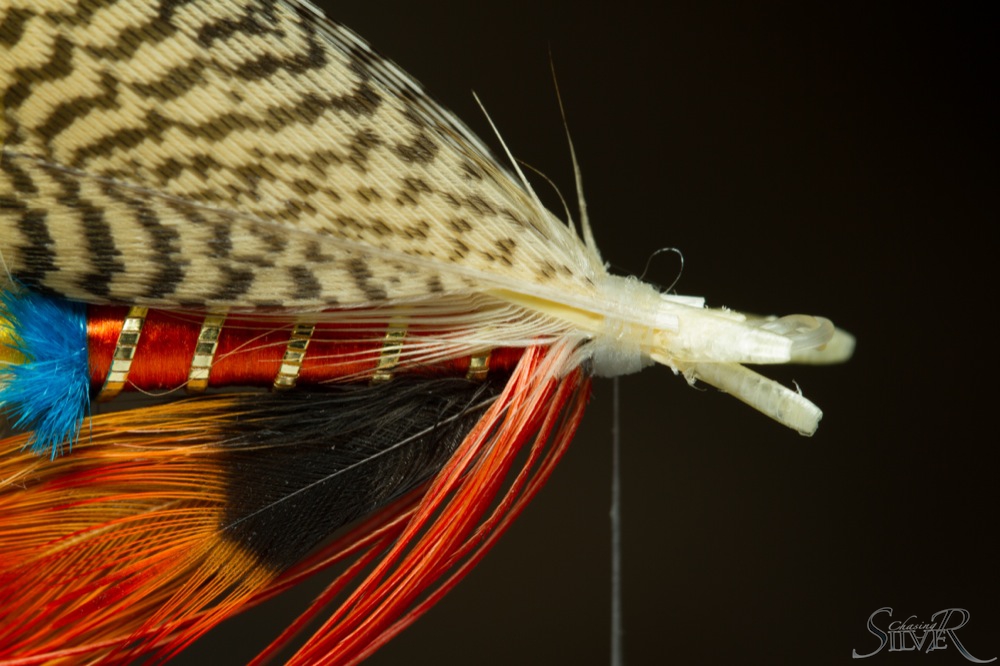
Take a short piece of gut, moisten it to make it softer and fold it around a stiletto to form the eye. Tie it in underneath the hook shank and add a layer of varnish to secure it.Start building an underbody with 210 denier UNI-Nylon or similar flat thread.Build a taper by going back and forth with touching turns of thread. First turn in the middle of the shank. Second 3/4 of the shank.Last turn all the way at the back close to the point of the barb.Burnish the underbody with a smooth object and attach your tying thread to the front and bring it back to about the point of the hook with touching turns.Attach tinsel for the tip of the tag underneath the hook shank just slightly to the opposite side of the hook so that when you turn your first wrap it will start straight at the center.Wrap 3 to 5 tight turns of tinsel from back to front and tie the tinsel in so that the last wrap doesn’t overlap the tag-end. Turn the excess adjacent to the shank and wrap forward to the point where you want your tail to be.Attach a piece of floss underneath the shank. Burnish the underbody again and the tinsel tip too to make it smoother.Wrap the floss carefully to the tinsel and back again and tie it in underneath the hook shank with couple of turns.Strip off excess fibers from the topping and flatten the stem from the tie in point with pliers. Tie it in straight on top of the shank.Do the same with an Indian Crow feather and try to tie it in flat straight on top of the topping.Tie in a butt from blue Ostrich herl.Tie the rib in underneath and again slightly on the opposite side of the hook. You can measure and mark the different body section with a marker, just make sure to measure space for the butts too.Wrap forward again in touching turns and attach the floss for the first body section.Make the rib with 5 turns of tinsel and try to keep the angle of the tinsel consistent.Tie in a pair of Blue Chatterer feathers for the body veiling. Flatten the stems again to make the feathers easier to align.Repeat on the other side of the hook.Add another butt and rib as before.Wrap the second body part and rib. To minimise the bulk of the tinsel at the tie in point you can tie it in with a couple of wraps and before cutting unravel the metal from the core which allows you to cut closer and make a smoother transition.Tie in veilings of Toucan as before. You can play with the position where you tie them due to the shape of the rachis some feathers are easier to tie on the sides to achieve similar results instead of straight under the shank.On the top it’s best to leave a gap between the ceilings for the wing to sit in.When tying Ostrich herl for the butt make sure that when you start winding it the small barbules face backwards.
To minimise the bulk on the head you can reverse the tying of the last floss part.Try to keep thread wraps minimal from this point forward as there is a lot of materials to tie on a tiny piece of hook.The narrowing taper in front makes ribbing a bit harder but again try to keep the angle the same all the way.Pay attention to proportions throughout the tying process.Tie in three pairs of Indian Crow underneath the hook shank.Because of the thick rachis on even the smaller Macaw feathers you can split the feather before tying.Start the hackle from the top so that you’ll get more wraps on the sides and brow the hook.Wrap the hackle in touching turns.You can strip the fibers from the top to not get in the way of the wing. Moisten the hackle and draw it down.Tie in the underwing straight on top to the shank.Pick feathers that are just the correct length and form perfect pairs.Flatten every feather with pliers before tying to achieve smaller and more secure tie in point.View from above of the first pairs. Make sure the wing is symmetrical and straight.Keep adding feathers in pairs to form the rest of the wing.Pay close attention to the angle where every feather starts as it will define the shape of the wing.Tie a narrow strip of Golden Pheasant tail over the wing.Measure and shape the topping before tying it in. As with other feathers flatten the tie in point and fold it so that the topping doesn’t compress the wing but hugs it closely.Check the fly from above and make sure the topping is straight on top.Add Blue Chatterer feather cheeks.Tie in horns and shape them with your fingernail to follow the shape of the wing and topping.I like to tie the horns as close to the topping as possible and check that the angle is symmetrical from the top too.Wax you thread well and make the surface of the head as flat as possible without adding too much bulk. If the head tapers too much it will be very hard to wrap the hero over it.Wrap the hero from front to back so that the barbules naturally face forwards.Fasten the herl to the base of the wing and make a finish the fly to the same point. Moisten the herl head and turn the barbules back over the thread wraps. Carefully cut the excess with a razor blade or sharp scissors.When the herl has dried a bit brush it to separate the barbules. Carefully add couple layers of varnish to the front of the head to finish the fly. you can also use a marker to color the head black or use black varnish in one of the layers.View from above of the finished fly.Finished Nepenthian.
Take a short piece of gut, moisten it to make it softer and fold it around a stiletto to form the eye. Tie it in underneath the hook shank and add a layer of varnish to secure it.
Start building an underbody with 210 denier UNI-Nylon or similar flat thread.
Build a taper by going back and forth with touching turns of thread. First turn in the middle of the shank. Second 3/4 of the shank.
Last turn all the way at the back close to the point of the barb.
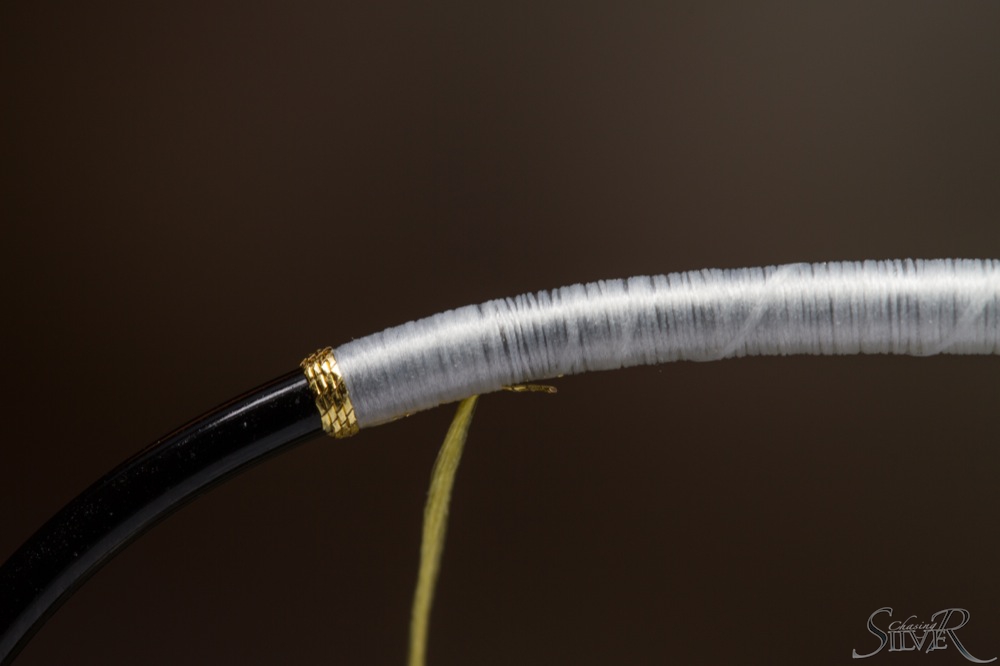
Burnish the underbody with a smooth object and attach your tying thread to the front and bring it back to about the point of the hook with touching turns.
Attach tinsel for the tip of the tag underneath the hook shank just slightly to the opposite side of the hook so that when you turn your first wrap it will start straight at the center.
Wrap 3 to 5 tight turns of tinsel from back to front and tie the tinsel in so that the last wrap doesn’t overlap the tag-end. Turn the excess adjacent to the shank and wrap forward to the point where you want your tail to be.
Attach a piece of floss underneath the shank. Burnish the underbody again and the tinsel tip too to make it smoother.
Wrap the floss carefully to the tinsel and back again and tie it in underneath the hook shank with couple of turns.
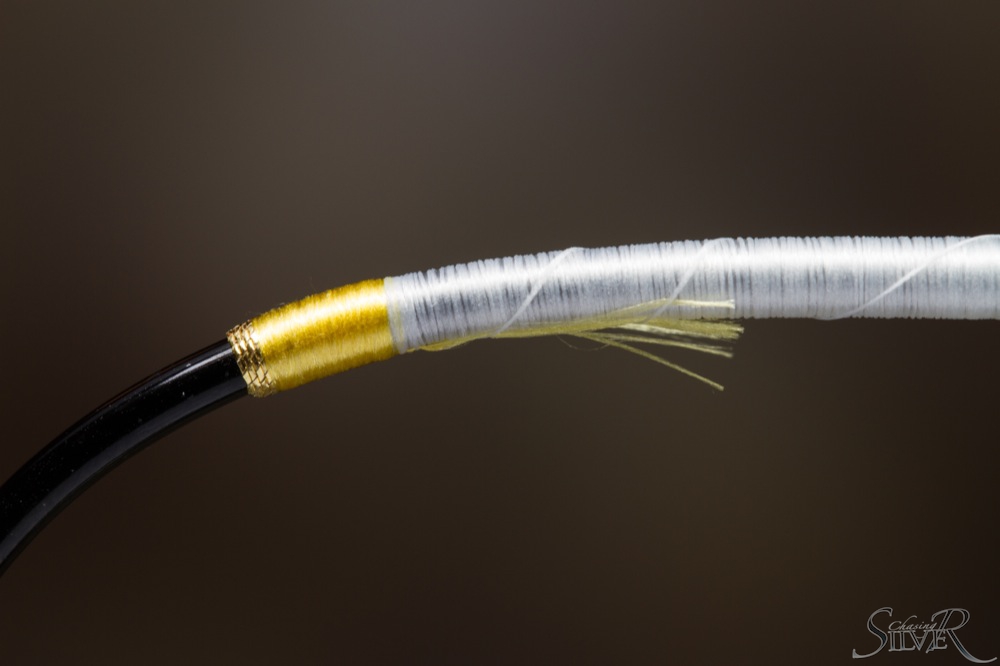
Strip off excess fibers from the topping and flatten the stem from the tie in point with pliers. Tie it in straight on top of the shank.
Do the same with an Indian Crow feather and try to tie it in flat straight on top of the topping.
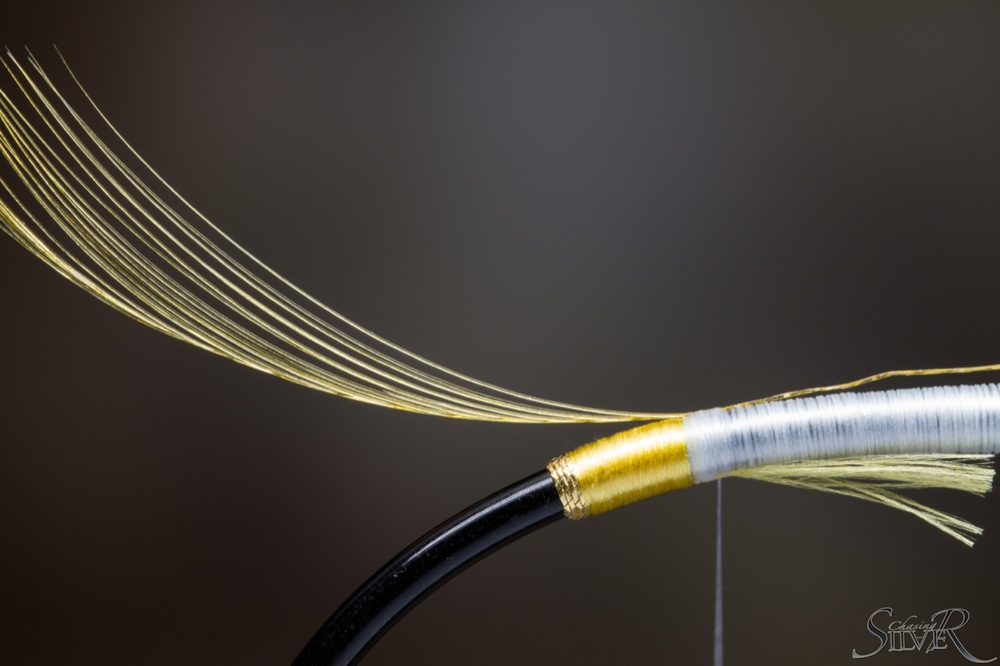
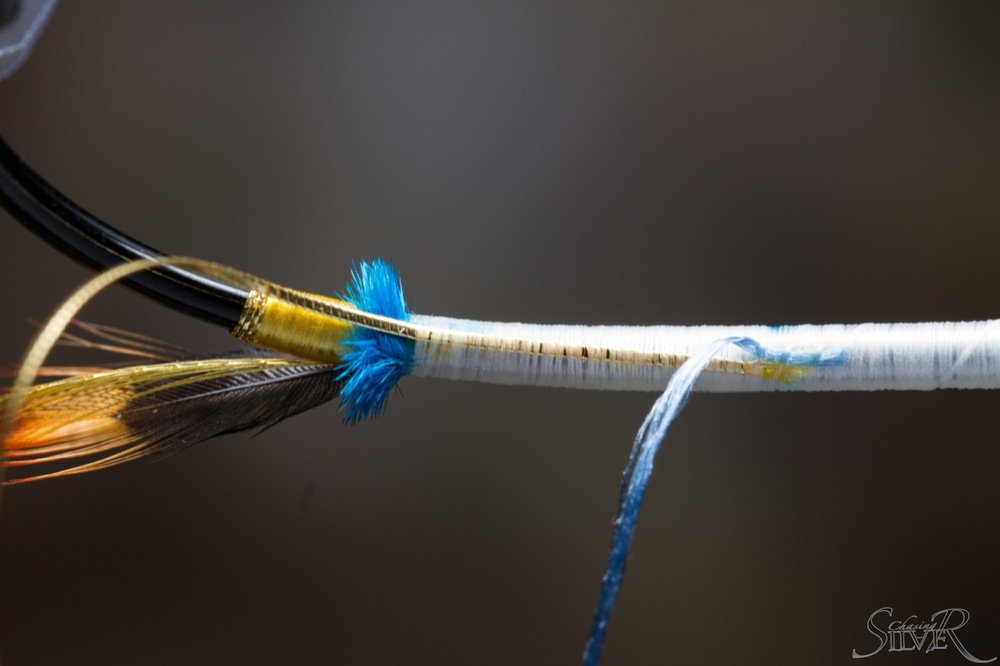
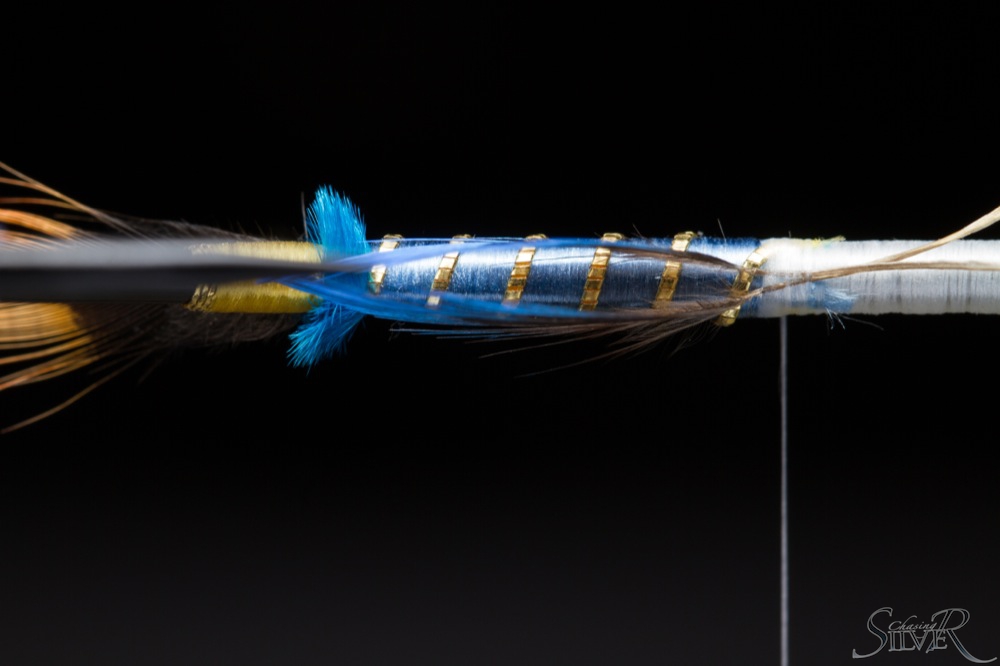
Tie in a butt from blue Ostrich herl.
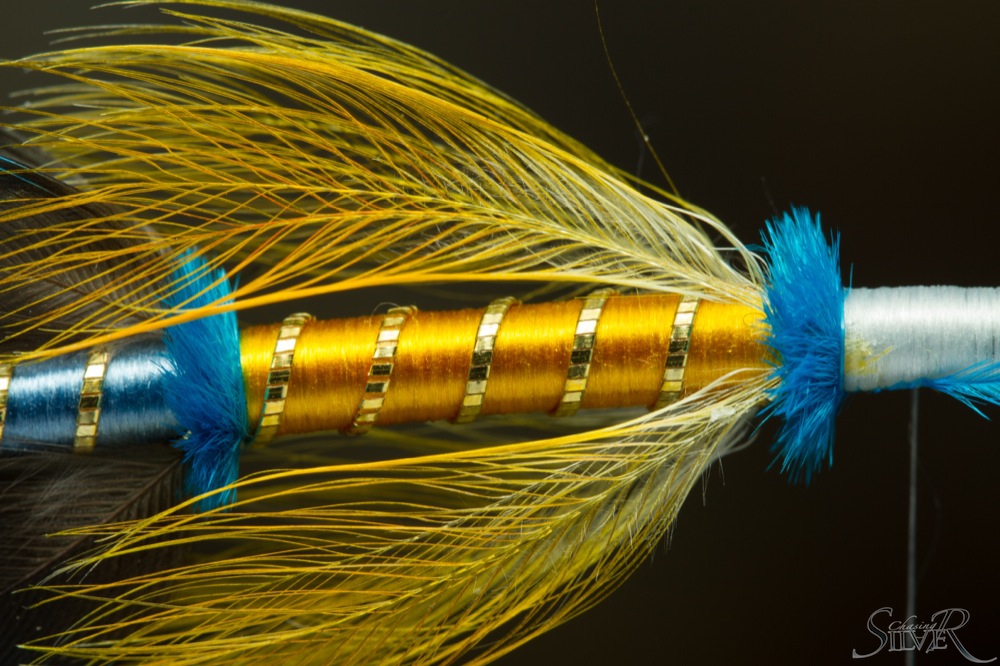
Tie the rib in underneath and again slightly on the opposite side of the hook. You can measure and mark the different body section with a marker, just make sure to measure space for the butts too.
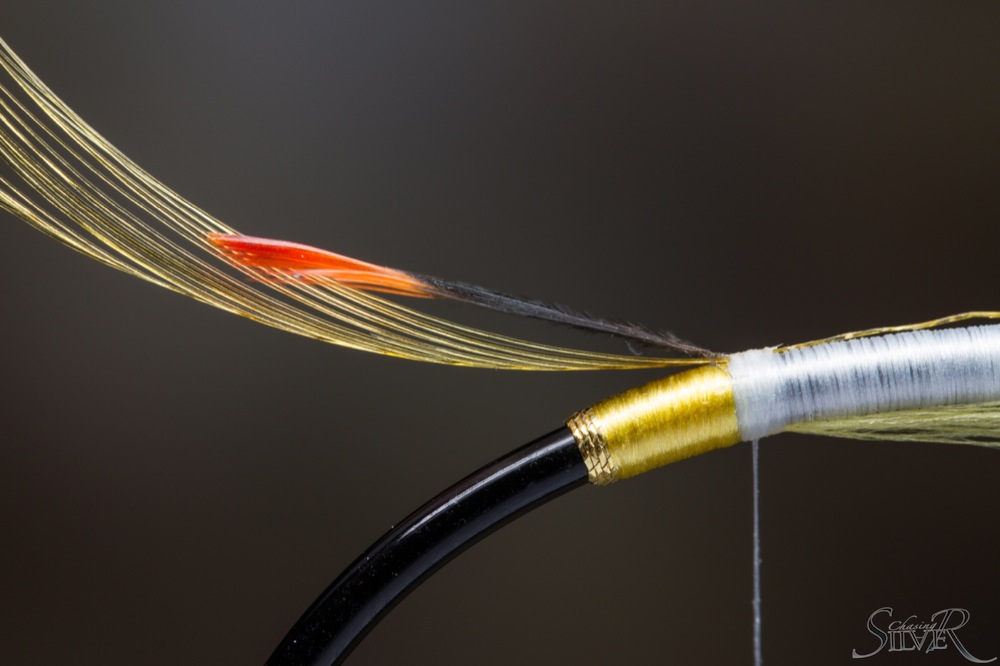
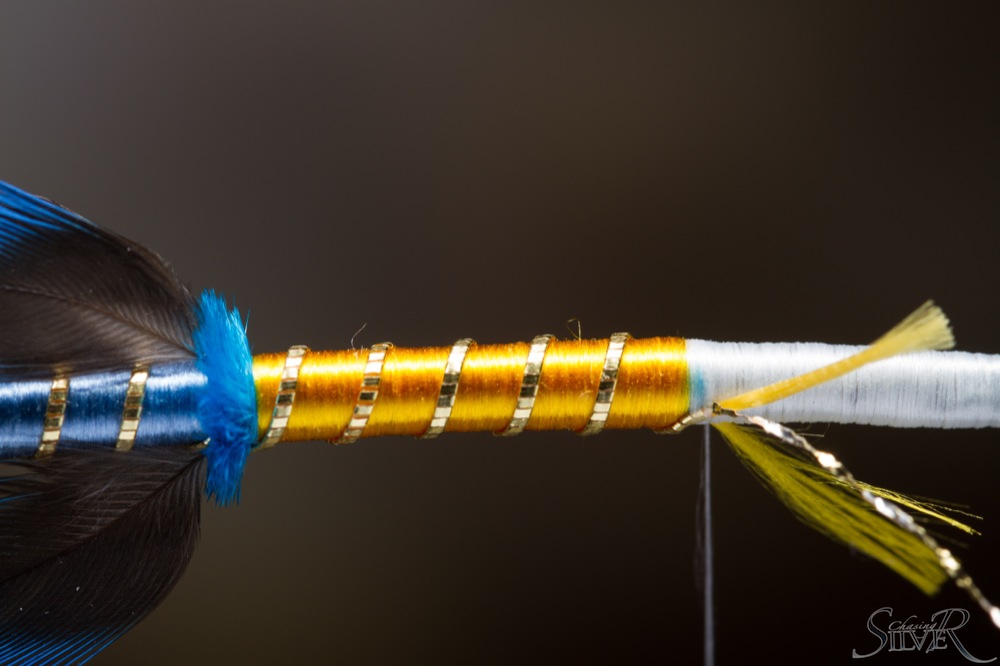
Wrap forward again in touching turns and attach the floss for the first body section.
Make the rib with 5 turns of tinsel and try to keep the angle of the tinsel consistent.
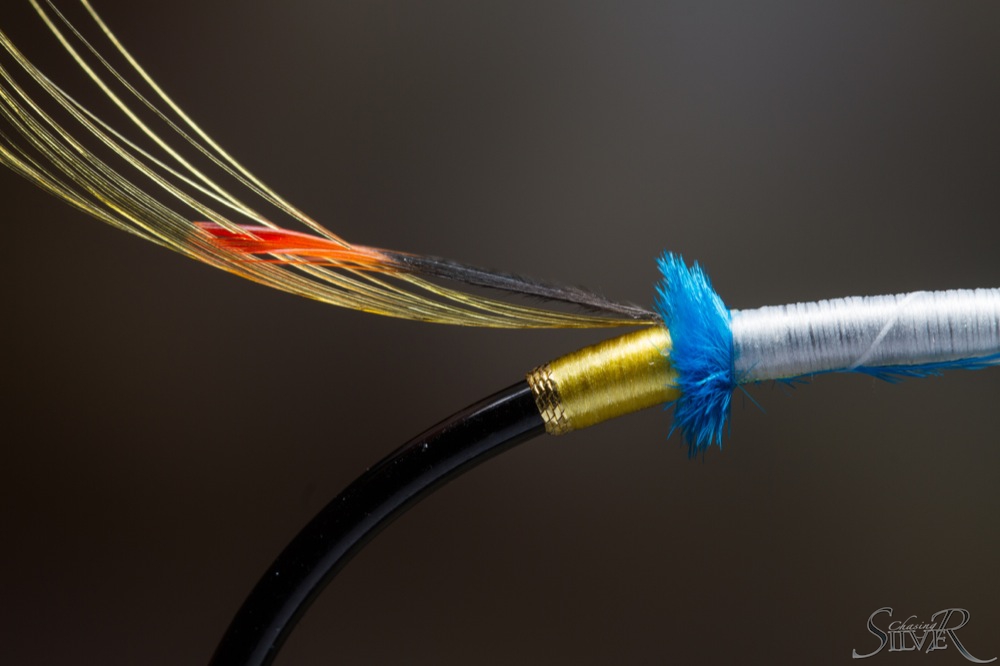
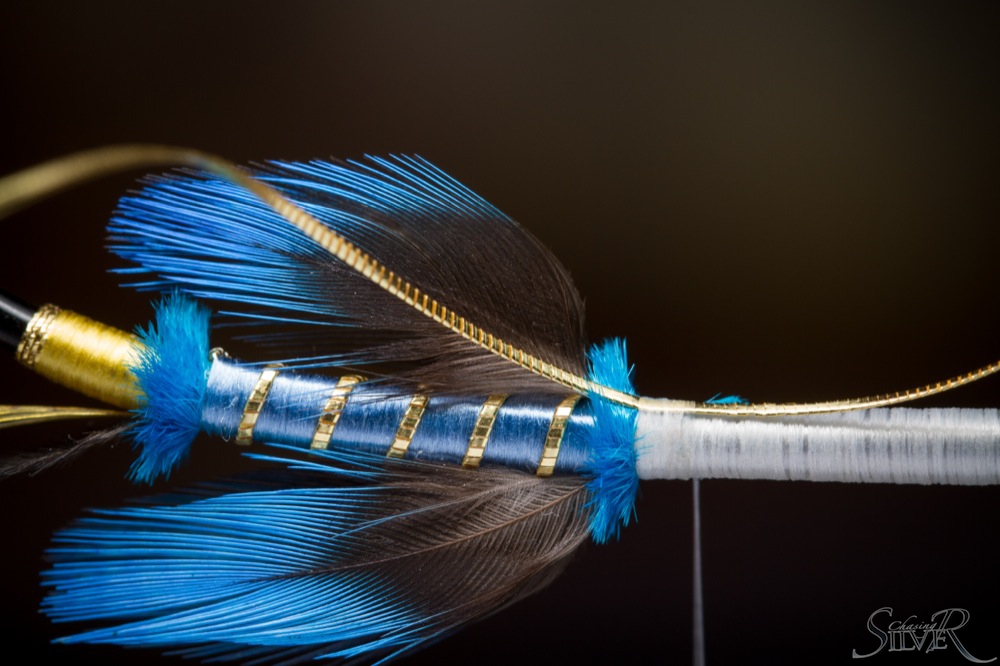
Tie in a pair of Blue Chatterer feathers for the body veiling. Flatten the stems again to make the feathers easier to align.
Repeat on the other side of the hook.
Add another butt and rib as before.
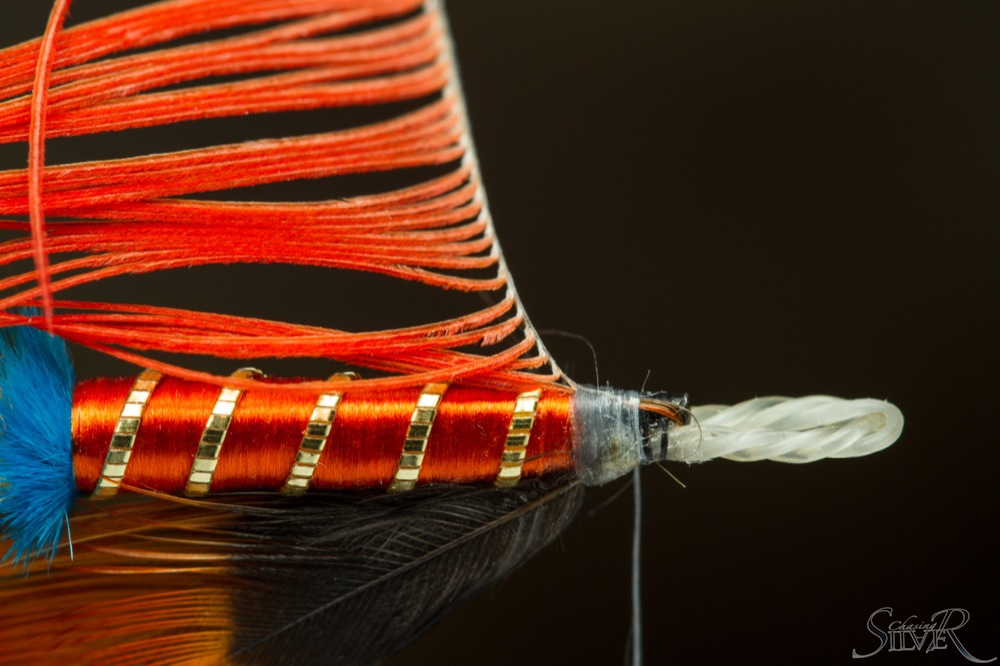
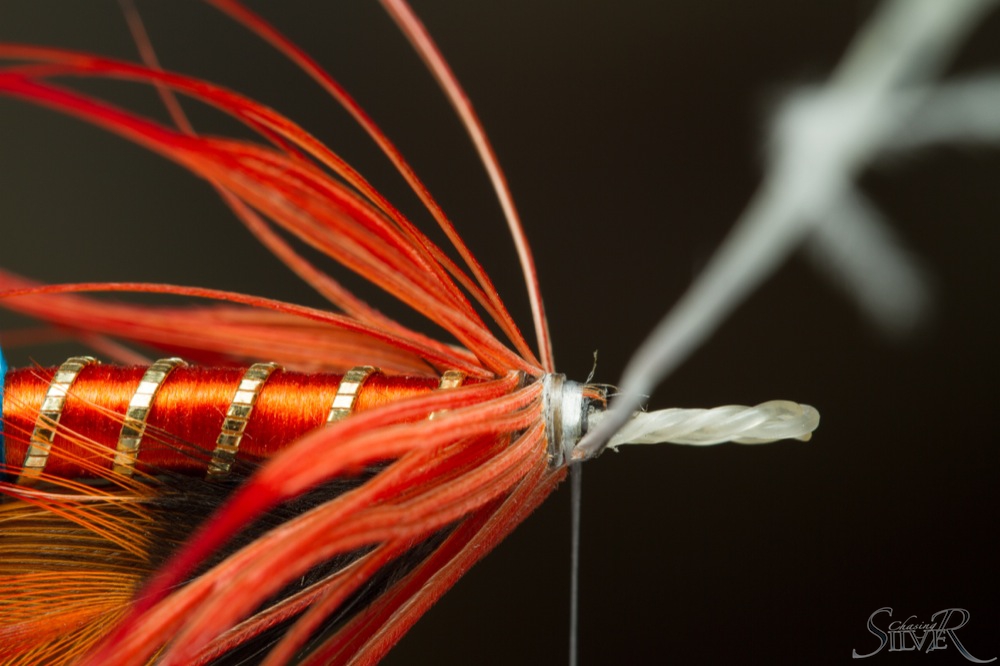
Wrap the second body part and rib. To minimise the bulk of the tinsel at the tie in point you can tie it in with a couple of wraps and before cutting unravel the metal from the core which allows you to cut closer and make a smoother transition.
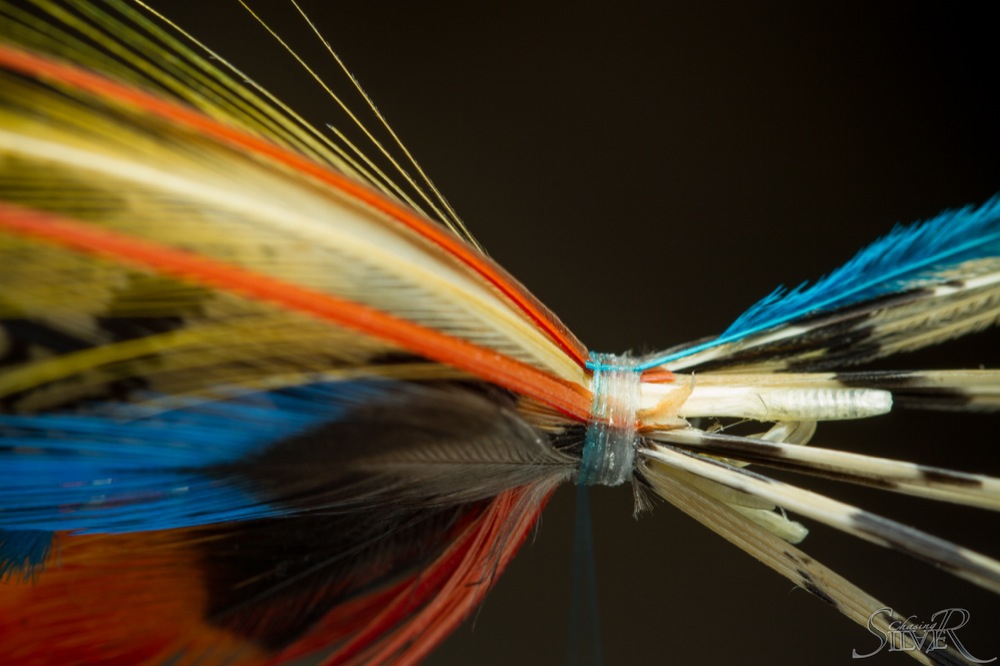
Tie in veilings of Toucan as before. You can play with the position where you tie them due to the shape of the rachis some feathers are easier to tie on the sides to achieve similar results instead of straight under the shank.
On the top it’s best to leave a gap between the ceilings for the wing to sit in.
When tying Ostrich herl for the butt make sure that when you start winding it the small barbules face backwards.
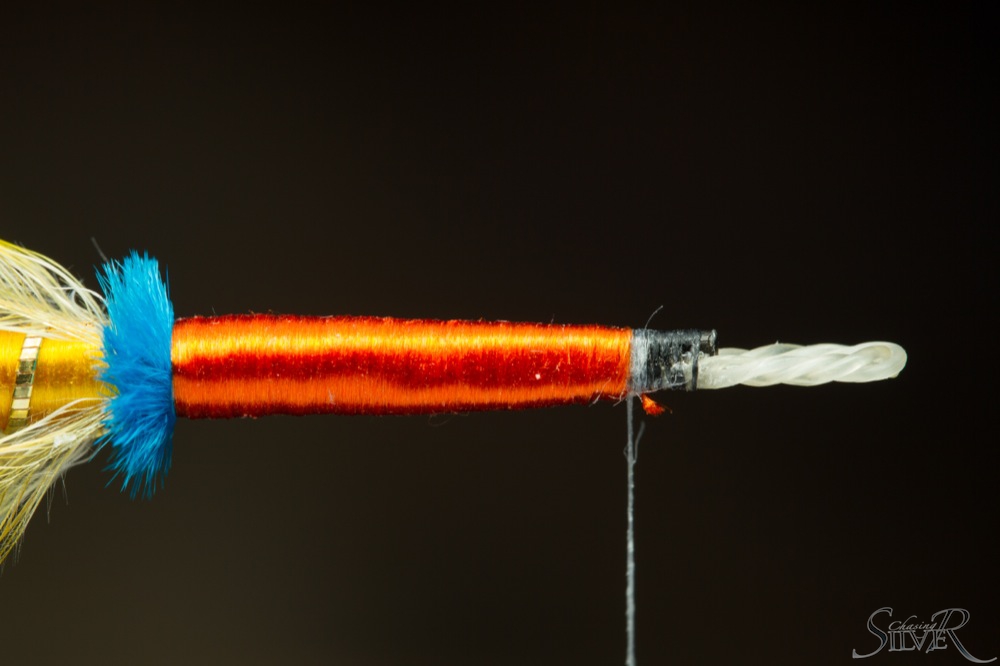
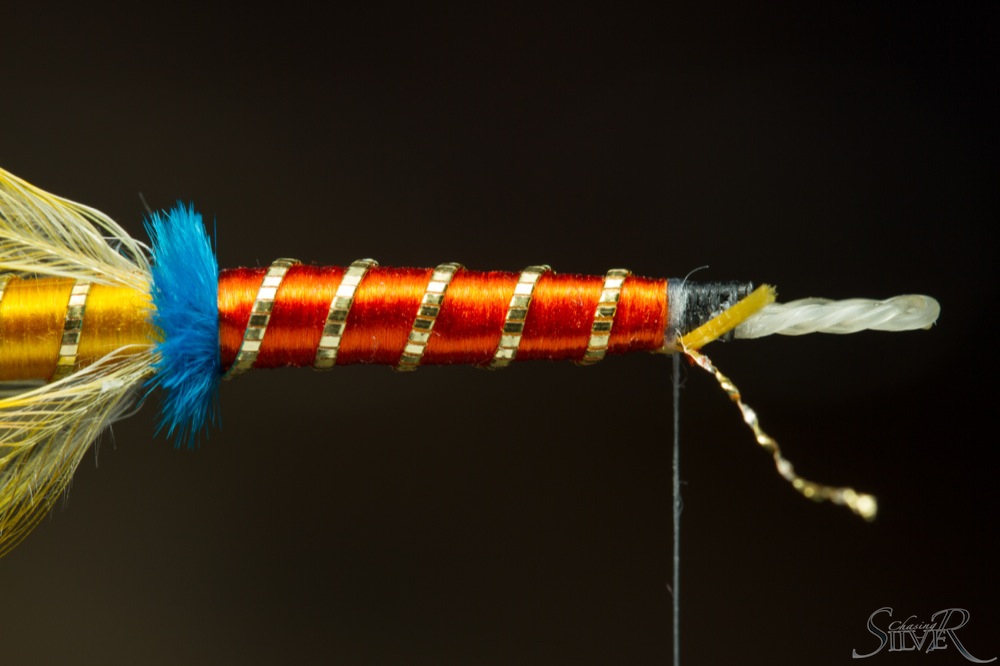
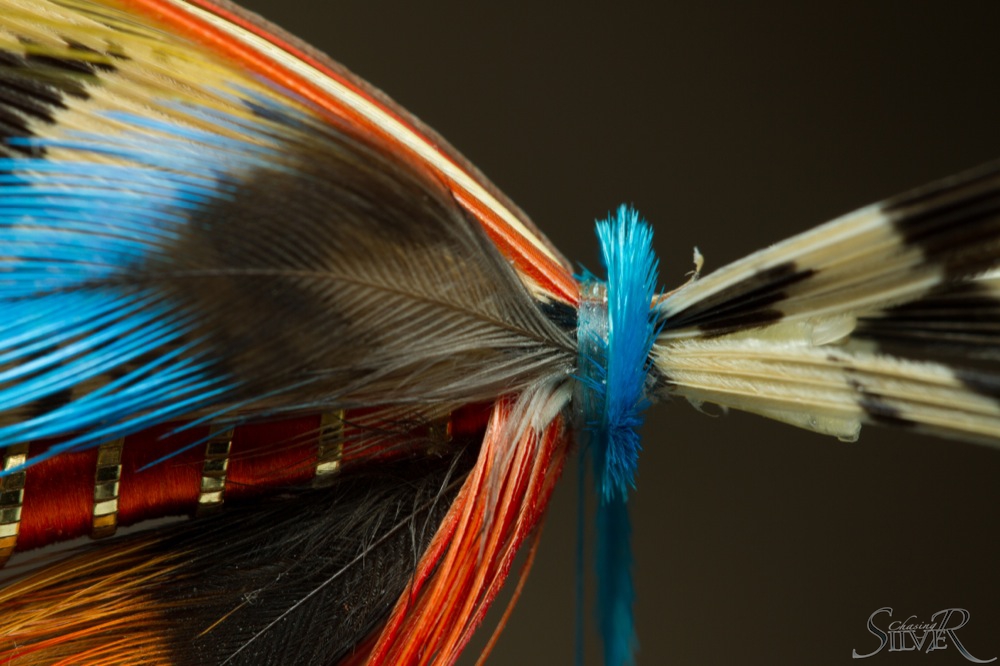
To minimise the bulk on the head you can reverse the tying of the last floss part.
Try to keep thread wraps minimal from this point forward as there is a lot of materials to tie on a tiny piece of hook.
The narrowing taper in front makes ribbing a bit harder but again try to keep the angle the same all the way.
Pay attention to proportions throughout the tying process.
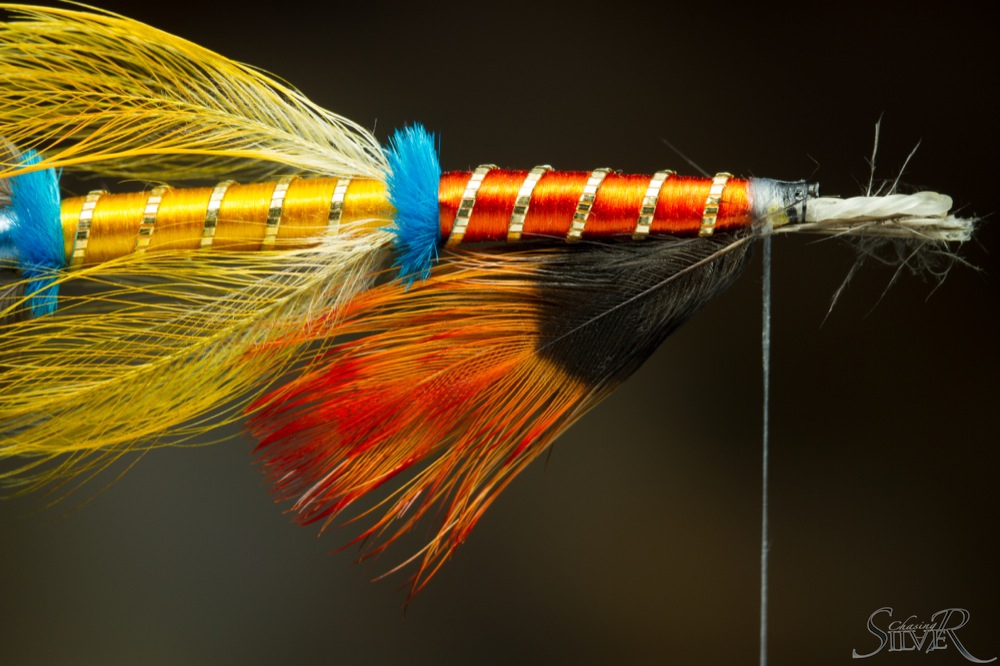
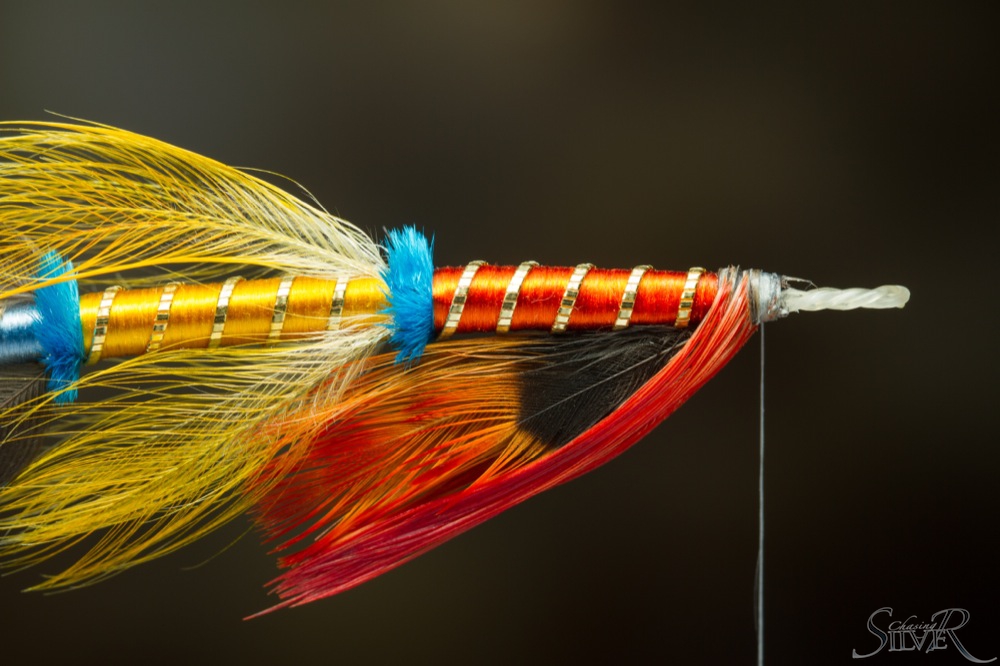
Tie in three pairs of Indian Crow underneath the hook shank.
Because of the thick rachis on even the smaller Macaw feathers you can split the feather before tying.
Start the hackle from the top so that you’ll get more wraps on the sides and brow the hook.
Wrap the hackle in touching turns.
You can strip the fibers from the top to not get in the way of the wing. Moisten the hackle and draw it down.
Tie in the underwing straight on top to the shank.
Pick feathers that are just the correct length and form perfect pairs.
Flatten every feather with pliers before tying to achieve smaller and more secure tie in point.
View from above of the first pairs. Make sure the wing is symmetrical and straight.
Keep adding feathers in pairs to form the rest of the wing.
Pay close attention to the angle where every feather starts as it will define the shape of the wing.
Tie a narrow strip of Golden Pheasant tail over the wing.
Measure and shape the topping before tying it in. As with other feathers flatten the tie in point and fold it so that the topping doesn’t compress the wing but hugs it closely.
Check the fly from above and make sure the topping is straight on top.
Add Blue Chatterer feather cheeks.
Tie in horns and shape them with your fingernail to follow the shape of the wing and topping.
I like to tie the horns as close to the topping as possible and check that the angle is symmetrical from the top too.
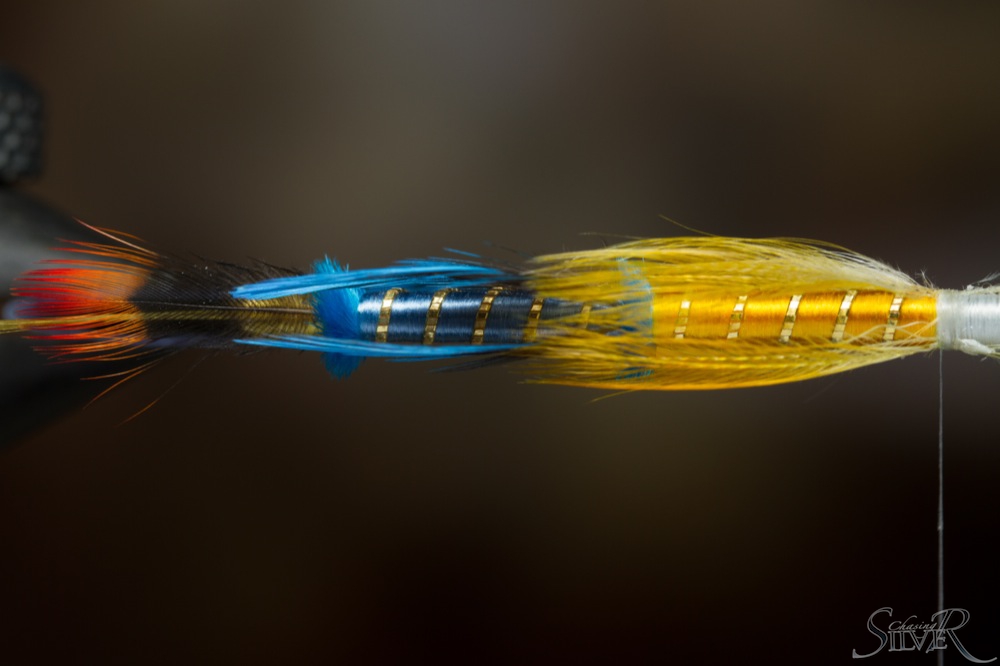
Wax you thread well and make the surface of the head as flat as possible without adding too much bulk. If the head tapers too much it will be very hard to wrap the hero over it.
Wrap the hero from front to back so that the barbules naturally face forwards.
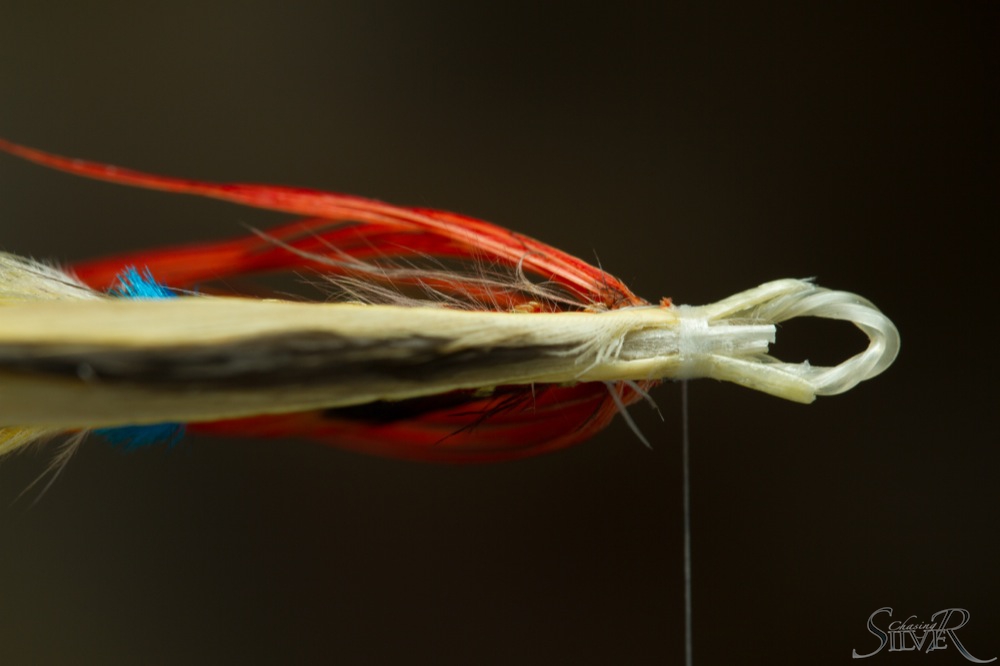
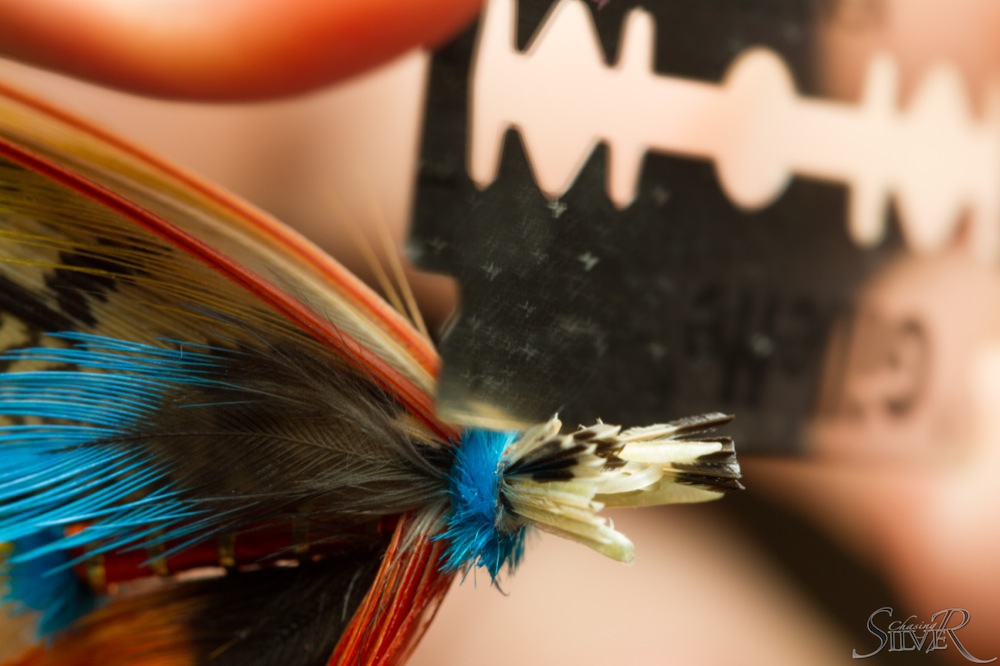
Fasten the herl to the base of the wing and make a finish the fly to the same point. Moisten the herl head and turn the barbules back over the thread wraps. Carefully cut the excess with a razor blade or sharp scissors.
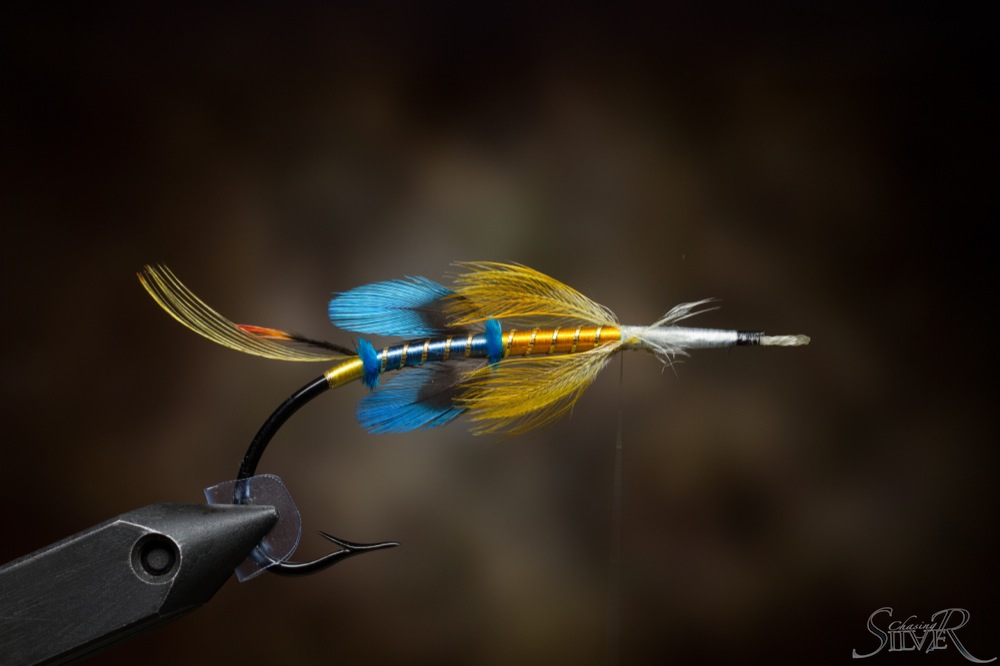
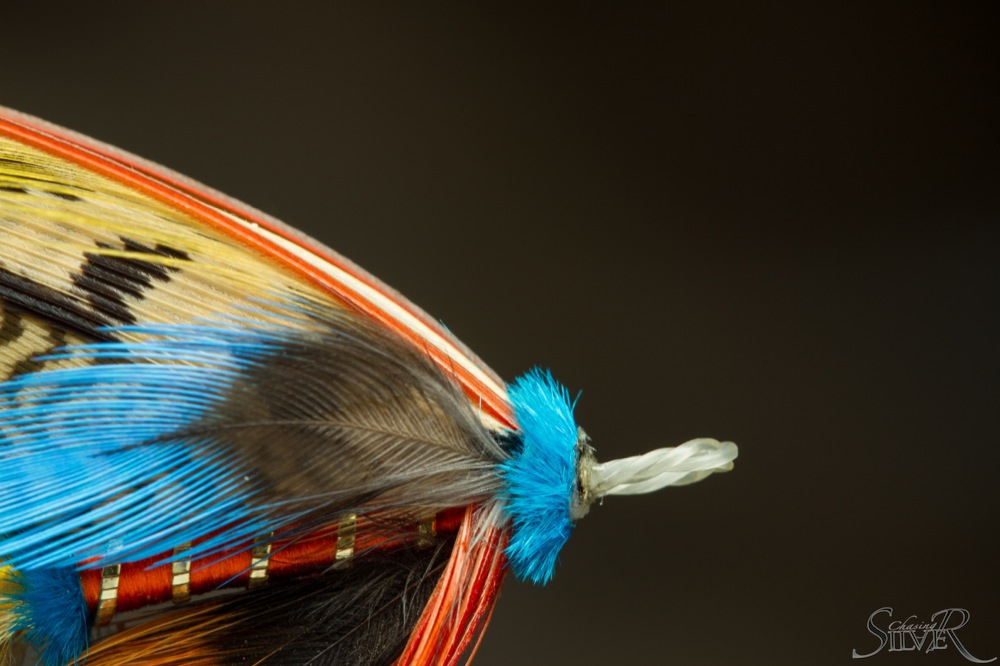
When the herl has dried a bit brush it to separate the barbules. Carefully add couple layers of varnish to the front of the head to finish the fly. you can also use a marker to color the head black or use black varnish in one of the layers.
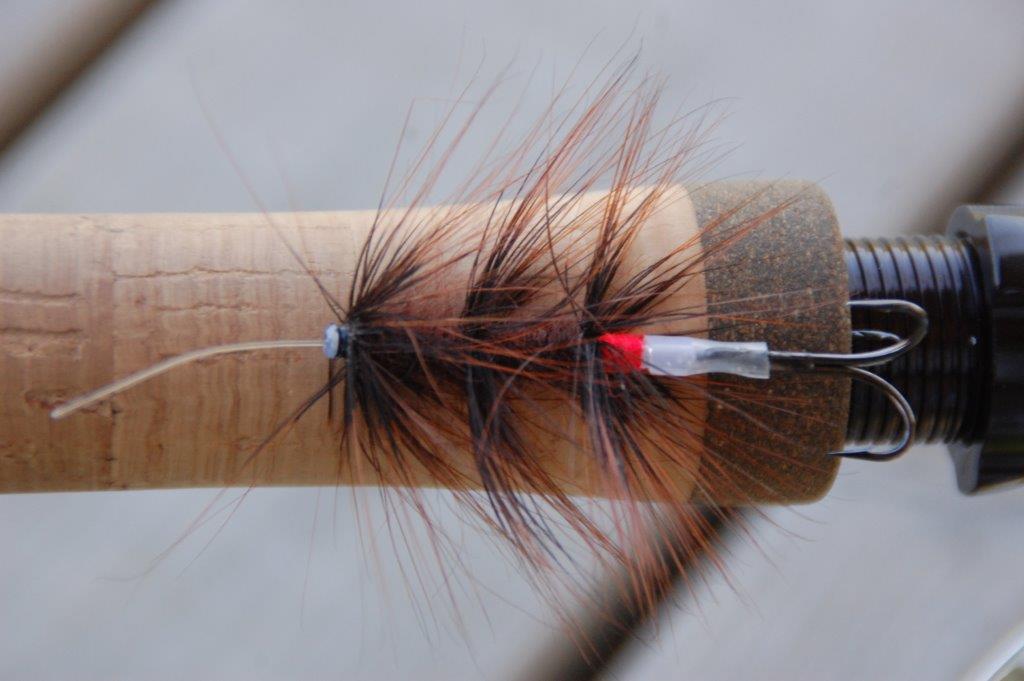
You know how nice and easy it is to tie flies from quality materials. They just make things very simple. Now days when I see quality materials that I might have use for somewhere in the near future I buy it right away. Even if I still have some of the old left. Bucktail, saddle hackles and Templedog are always on my shopping list as they are hard to find at highest level of quality and those materials I use a lot. I can tell you that it hasn’t been easy to finding “the good stuff”. Sometimes it feels almost impossible. Thankfully it seems that fly shops are stepping up on this subject. It seems like the quality of the product gets more attention then before and that’s a very, very good thing! Even though many suitable materials for example for my tubes aren’t expensive, I will always put in a few euros more for quality. It pays to do so in the long run.
Quality stuff = fun times at the vise
Now to the subject and enough of the “bitching”… Even though I like to use quality stuff, my fishing flies have become simpler and simpler. Simple flies that move well and have a clean look to them are my thing. Form follows function.
A form that works
So does this mean I will throw flies that look like they were tied by a 5-year old? Maybe, but at least I’m using quality materials to make them☺ . I just like to strip out all the non-essential stuff out. I follow a three step “rule” on the flies that I tie:
The fly must have a shape and form that the fish like. That’s rule number one. Even if a fly looks kinda funny to a human eye, it’s the fish that matter.
The fly must be as foul proof as possible. Remember, good proportions and taper makes a big difference in this. So does material choices.
The fly must be tied well no matter how simple the pattern is. That’s a big confidence factor.
A good underwing is the key in making this type of tubesSimple, but still quite beautiful?
I’ll be back with some tying instructions on these “Simpleton” flies and maybe even a vid or two.
Ps. If any of you have some ideas on color combos for The Gaula I’m all ears. I’m heading that way in a few weeks. Use the comment form below!
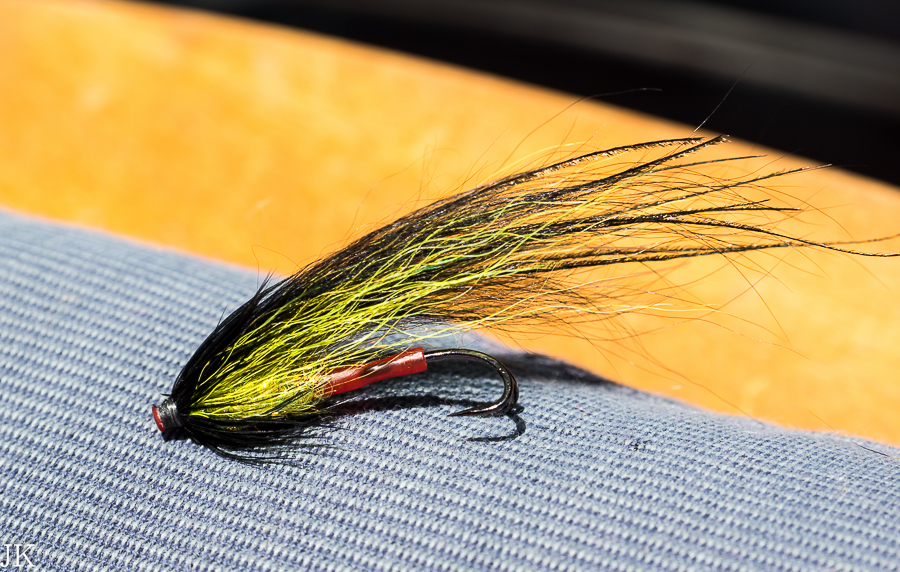
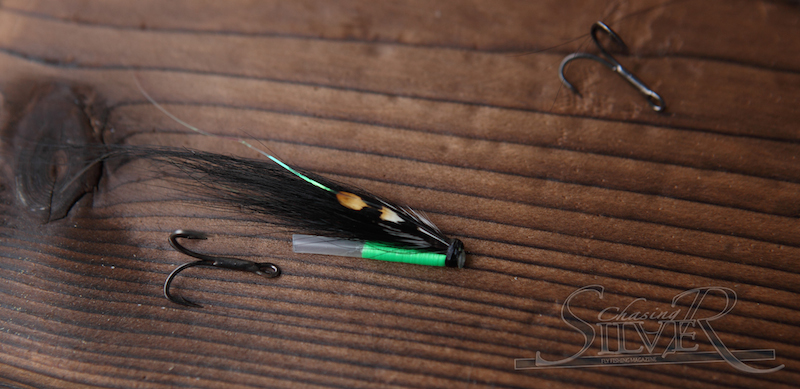
Salmon season is almost on the door in Norway. Here are few very simple, but effective patterns for Atlantic Silvers. This kind of tube flies are very popular here in Scandinavia. Especially in the clear water rivers in northern Norway these flies had done really good job when given a chance to prove their abilities.
This selection is from a fly box of our Editor in Chief, Miki, and he has used similar Monkey winged flies many years with very good success. This sort of flies are really easy to tie. One important aspect with the wing is that it won’t get stuck to the hook so easily despite it’s fairly long and thin. It’s great when you can be certain that the fly is in a good shape all the time. Underwing is tied from bucktail and it’s topped with Monkey hair carefully tied to provide slim and lively construction.
Miki only use plastic tubes with these patterns and if for some reason he has to go deep, or slow down the speed of the fly, he prefers to use sinking lines instead of adding weight to the tube.
In my opinion the key point for successful fishing is speed and presentation of the fly.
Sometimes it is better to use weighed tubes. But if you think what happens during the swing, we actually don’t know what´s exactly going on end of the tippet. We simply don’t have a precise control over the fly but what we can control is the fly line. The fly line is our tool controlling the speed of the fly and that’s why it’s sometimes better to use sinking lines even if the pool is not so deep.
Now you know the big secret. I recommend tying some for the coming season no matter where you’re after Atlantic salmon. Have a great upcoming season and remember – Do the Spey!
Our sales guy, Tommi, has been having some good time in River Mörrum Sweden the past week or so. Today he reported some fascinating news about a catch of his fishing companion Mr. Mikko Jutila. A fresh salmon measured 112cm was landed today and according to locals it was the earliest salmon catch in 74 years. Amazing! Mörrums Kronolaksfiske has been reporting about a good start in their Facebook pages but we wanted to share some insights about the fly that was chosen by the fish.
The previous day Mikko caught an eye on an old rusty Ullsocken fly in the river bank. Poor Ullsocken, a real Mörrum classic, was in a bad shape and the guys made some funny jokes about anyone who would dare to tie it on the leader. Well, there’s always one in a group who is brave enough to do thing others won’t do. So was in this group and this guy was the only one who hooked a few good sea trout that day and all others didn’t have a pull.
Encouraged by the catches the guys went to a local fly fishing shop to get some tying materials. Not everything they hoped was available so they bought what was in their minds “close enough”. That night Tommi tied a tube fly variation of Ullsocken to his friend. Though, Mikko was pretty much in charge and appointed the materials that must be used in the fly. What the guys didn’t knew yet was, that it would only take ten casts for the first Atlantic salmon catch in Mörrum river in 2014…
[fbls]
Manage Cookie Consent
To provide the best experiences, we use technologies like cookies to store and/or access device information. Consenting to these technologies will allow us to process data such as browsing behavior or unique IDs on this site. Not consenting or withdrawing consent, may adversely affect certain features and functions.
Functional
Always active
The technical storage or access is strictly necessary for the legitimate purpose of enabling the use of a specific service explicitly requested by the subscriber or user, or for the sole purpose of carrying out the transmission of a communication over an electronic communications network.
Preferences
The technical storage or access is necessary for the legitimate purpose of storing preferences that are not requested by the subscriber or user.
Statistics
The technical storage or access that is used exclusively for statistical purposes.The technical storage or access that is used exclusively for anonymous statistical purposes. Without a subpoena, voluntary compliance on the part of your Internet Service Provider, or additional records from a third party, information stored or retrieved for this purpose alone cannot usually be used to identify you.
Marketing
The technical storage or access is required to create user profiles to send advertising, or to track the user on a website or across several websites for similar marketing purposes.